Network monitoring has become an essential part of modern IT infrastructure management. With the rise of affordable and versatile hardware like the Raspberry Pi, creating your own Raspberry Pi network monitor is now easier than ever. Whether you're a small business owner or a tech enthusiast, leveraging this tiny yet powerful device can help you keep an eye on your network's health and performance.
In this comprehensive guide, we will walk you through the process of building a Raspberry Pi network monitor, covering everything from setup and configuration to advanced monitoring techniques. By the end of this article, you'll have the knowledge and tools needed to create a robust and cost-effective network monitoring solution tailored to your needs.
As networks grow in complexity, so does the importance of real-time monitoring. A Raspberry Pi network monitor allows you to track bandwidth usage, detect potential threats, and ensure optimal performance for all connected devices. Let's dive into the details of how you can harness the power of Raspberry Pi for your networking needs.
Read also:4movierulz Telugu 2023 The Ultimate Guide To Telugu Movies And Beyond
Table of Contents
- Introduction to Raspberry Pi Network Monitoring
- What is Raspberry Pi?
- Why Use Raspberry Pi for Network Monitoring?
- Hardware Requirements for Raspberry Pi Network Monitor
- Setting Up the Software Environment
- Top Tools for Raspberry Pi Network Monitoring
- Step-by-Step Installation Guide
- Advanced Features of Raspberry Pi Network Monitor
- Troubleshooting Common Issues
- Conclusion and Next Steps
Introduction to Raspberry Pi Network Monitoring
Raspberry Pi network monitoring offers a cost-effective and customizable solution for tracking and analyzing your network's performance. Unlike traditional network monitoring systems, which can be expensive and complex, Raspberry Pi provides a flexible platform that can be tailored to fit various requirements.
This section will cover the basics of network monitoring, the role of Raspberry Pi in this process, and why it's becoming increasingly popular among IT professionals and hobbyists alike. We'll also touch on the benefits of using open-source tools and how they contribute to the overall efficiency of your network monitoring setup.
What is Raspberry Pi?
Raspberry Pi is a series of small single-board computers developed by the Raspberry Pi Foundation. These devices are designed to promote the teaching of basic computer science in schools and developing countries but have since gained popularity among enthusiasts and professionals for their versatility and affordability.
Key Features of Raspberry Pi
- Compact size
- Low power consumption
- Support for multiple operating systems
- Wide range of GPIO pins for external connectivity
Raspberry Pi's affordability and ease of use make it an ideal choice for DIY projects, including network monitoring systems. Its ability to run lightweight Linux distributions ensures that it can handle various monitoring tasks without requiring significant resources.
Why Use Raspberry Pi for Network Monitoring?
Using Raspberry Pi for network monitoring offers several advantages over traditional monitoring solutions:
Cost-Effectiveness
Raspberry Pi devices are significantly cheaper than dedicated network monitoring appliances. This makes them an attractive option for small businesses and individuals looking to monitor their networks without breaking the bank.
Read also:Bruno Mars And The Rumors About His Health Does Bruno Mars Have Cancer
Customizability
With Raspberry Pi, you have the freedom to choose and configure the software and tools that best suit your needs. This level of customization allows you to create a monitoring system that is tailored specifically to your network's requirements.
Energy Efficiency
Raspberry Pi consumes very little power compared to other computing devices, making it an environmentally friendly choice for long-term network monitoring applications.
Hardware Requirements for Raspberry Pi Network Monitor
Before setting up your Raspberry Pi network monitor, you'll need to gather the necessary hardware components. Below is a list of essential items:
- Raspberry Pi board (preferably Raspberry Pi 4 for better performance)
- MicroSD card with at least 16GB capacity
- Power supply compatible with your Raspberry Pi model
- Ethernet cable for stable network connection
- Optional: Wi-Fi dongle or USB adapter for wireless connectivity
Having the right hardware is crucial for ensuring the smooth operation of your network monitoring system. Make sure to choose high-quality components to avoid any potential issues down the line.
Setting Up the Software Environment
Once you have all the necessary hardware, it's time to set up the software environment for your Raspberry Pi network monitor. This involves installing an operating system and configuring the necessary tools for monitoring.
Choosing an Operating System
Raspberry Pi supports a variety of operating systems, but for network monitoring purposes, it's recommended to use a lightweight Linux distribution such as Raspbian or Ubuntu Server. These systems are optimized for performance and provide the flexibility needed for running monitoring applications.
Installing Monitoring Software
Several open-source tools are available for network monitoring on Raspberry Pi. Some popular options include:
- Pi-Hole: A network-wide ad blocker that also provides DNS query monitoring.
- PRTG Network Monitor: A feature-rich monitoring solution with a Raspberry Pi version available.
- Zabbix: A powerful monitoring tool capable of tracking various network parameters.
Choose the tool that best aligns with your monitoring goals and follow the installation instructions provided by the respective developers.
Top Tools for Raspberry Pi Network Monitoring
When it comes to network monitoring on Raspberry Pi, there are several excellent tools to consider. Below are some of the top options:
Pi-Hole
Pi-Hole is a popular choice for network administrators looking to block ads and track DNS queries across their network. It's easy to set up and provides valuable insights into the types of traffic passing through your network.
PRTG Network Monitor
PRTG offers a comprehensive suite of monitoring features, including bandwidth usage tracking, device status monitoring, and more. Its Raspberry Pi version allows you to run the system on your Pi while maintaining all the advanced functionalities.
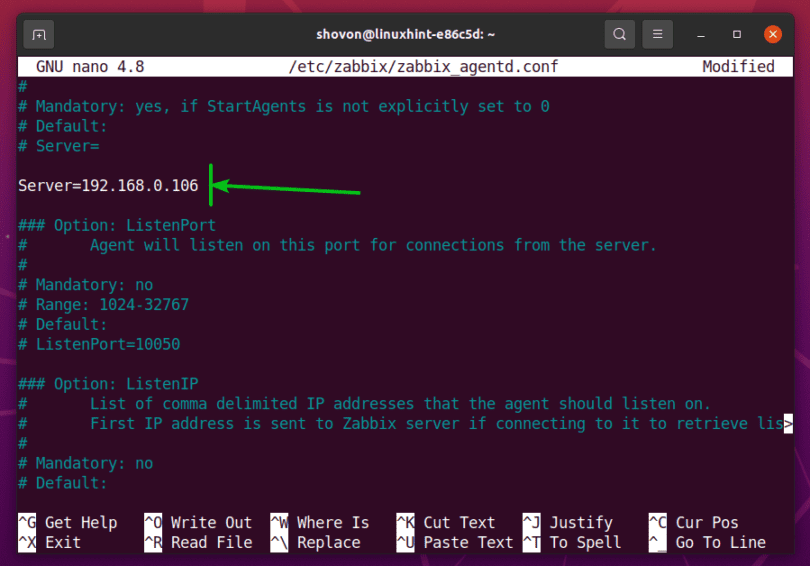
Zabbix
Zabbix is a robust monitoring tool that supports a wide range of network parameters. It's highly customizable and can be integrated with other systems for enhanced monitoring capabilities.
Step-by-Step Installation Guide
Here's a step-by-step guide to help you set up your Raspberry Pi network monitor:
- Install the chosen operating system on your MicroSD card using a tool like Etcher.
- Insert the MicroSD card into your Raspberry Pi and power it on.
- Connect to your Raspberry Pi via SSH or directly using a monitor and keyboard.
- Update the system packages using the package manager (e.g., apt for Debian-based systems).
- Install the desired monitoring software by following the official installation instructions.
- Configure the monitoring tool to suit your specific network requirements.
Following these steps will ensure that your Raspberry Pi network monitor is up and running in no time.
Advanced Features of Raspberry Pi Network Monitor
Once you have the basic setup complete, you can explore advanced features to enhance your network monitoring capabilities. Some of these features include:
Alert Notifications
Set up email or SMS alerts to notify you of any network anomalies or performance issues. This ensures that you're always aware of potential problems and can take corrective action promptly.
Data Visualization
Use tools like Grafana to create visually appealing dashboards that display real-time network statistics. This makes it easier to interpret the data and identify trends or patterns.
Automation
Implement automation scripts to perform routine tasks, such as log file analysis or device health checks. This reduces manual effort and improves the overall efficiency of your monitoring system.
Troubleshooting Common Issues
Even with careful planning and setup, issues can arise when working with Raspberry Pi network monitors. Below are some common problems and their solutions:
- Performance Issues: Ensure that your Raspberry Pi has adequate resources and that the monitoring software is optimized for performance.
- Connection Problems: Check your network configuration and ensure that all devices are properly connected.
- Software Errors: Refer to the official documentation or community forums for troubleshooting tips related to specific software errors.
By addressing these issues promptly, you can maintain the reliability and effectiveness of your Raspberry Pi network monitor.
Conclusion and Next Steps
In conclusion, building a Raspberry Pi network monitor is an excellent way to gain insights into your network's performance and ensure its optimal operation. By leveraging the power of Raspberry Pi and open-source monitoring tools, you can create a customized solution that meets your unique needs.
We encourage you to share your experiences and ask questions in the comments section below. Additionally, feel free to explore other articles on our site for more tips and tricks on optimizing your network infrastructure. Together, let's build a more connected and efficient digital world!